Today marks 39 weeks of the fastest/slowest pregnancy ever! Anytime pregnancy falls into two different calendar years it seems to go on forever. Not to mention I found out I was pregnant at the very end of summer when it was still warm and it is starting to get warmer again here.
We are using this weekend to get some last minute things done and spend some time as a family before we go in on Monday for the delivery of Baby Girl.
We still don't have a name for her. It's hard because all the names we like individually don't really settle well with the other. I am adamant that we both have to love the name and I feel like we are getting so close. I think when we see her we will know.
At 39 weeks, I am definitely feeling the urge to be done and delivered! Baby Girl, you move around so much and love hearing your brother's voices. You put on quite the show for them. They watch my stomach move up and down and all around. Joey is so excited to meet you. He confessed the other day he was nervous because he didn't know how to take care of a girl. It made him feel better to know that I had never taken care of one either and that we would learn together. Van is still blissfully unaware of the big change that is about to happen. He knows my tummy is big and when you ask him to "show me your baby" he will lift his shirt up and proudly pat his own stomach. It is adorable! Daddy is eager for your arrival. He is so nonchalant about it all. I ask him if he is nervous and he just gets a big grin on his face and says, "I can't wait!" For me it has been an utter joy carrying you for these 39 weeks. I have amnesia about the first 23 being rough and so sick, but the last 16 weeks have been so blissful. I cannot wait to meet you and to have a daughter. I say it all the time, but I am still shocked to be getting a girl! It is a dream come true!
I just put the finishing touches on the nursery today. I got a special delivery in the mail yesterday from Auntie Kara that pretty much finished the room for me. I was dreading having to sew another blanket for the end of the bed (I am burnt out from sewing), but when I opened the package and and saw the beautiful quilt she made I knew it completed the room! Thanks Kara!
Without further ado, here is the reveal!
The color inspiration came from the fabric I purchased for the curtains. I admit it was a bit difficult finding patterns and colors to go with it but I kind of let the eclectic look take over. I suppose I also unintentionally made the nursery a flower theme, although it wasn't the original plan. At the end of the bed you can see the quilt Kara made. The pink blanket on the crib was a registry gift, but the crib skirt was a huge sewing triumph for me. I never knew you could sew ruffles on your sewing machine. This tutorial was majorly helpful in the process. It took me longer to cut, iron and hem then to do the actual ruffles.
The goal was to do as much DIY as possible when it came to the room. The flower poms over the crib were a new craft for me. I am not sure I love them completely but they help to bring the focal point up in the room and take over the white wall space. I followed this tutorial here for the poms. The pinwheel garland over the closet doors actually came from Joey's 6th birthday banner. The colors didn't quite match, but there is red in the curtains so it did coordinate.
I went way overboard on hair bows and I am not even sorry for it. Not gonna lie, I will make more! I made sure to attach the clips to only the flower pieces so that I could switch out the assorted elastics with coordinating pieces. There are so many options to try out! The headband frame came from Pinterest, and I just used coordinating colors to make it my own. The original source can be found here.
Beneath the recycled changing table (was an Ikea hutch/desk) that used to be Van's is an assortment of burp clothes and nursing pads I made out of flannel and chenille cloth. Technically I could have reused the clothes I made for Van, but we still do use those on him for meal time messies and I couldn't pass up the really awesome sale Joann's seemed to have forever on flannel.
I have to laugh at the full size bed in the room. It was so close to being trashed on the last move, but Josh really nailed it together this time. It's not going anywhere unless you take an ax to it. I slabbed a coat of mistinted painted from Lowes on it. DEAL! The headboard used to be open with metal bars going through the four open slots. No joke, I upholstered cardboard with a little bit of batting and some leftover Chevron Premier Prints fabric and hot glue gunned it into the openings. It cost me nothing since everything was either in the recycling or left over from a previous project. The two bright coral tables came with the bed. It used to belong to my sister and all pieces were unfinished wood. Valspar had samples of their spring paints on sale at Lowes for $3. I saw it as a great excuse to pick up a color and try it out, not to mention who doesn't love a little bit of pink furniture? The pillowcases were sewn by me using some of Joann's calico prints and quilters cotton. The lamp base used to be black and the shade was a clearance find at Target.
The flower art pieces were made using canvas and assorted flower making tutorials a lot similar to headbands. The left flower (pink canvas) was a basic ruffle attached with hot glue in a flower shape. This tutorial was really helpful. The middle canvas was a completely though of on my own. Using different hair flower techniques I simply attached them to a painted canvas and painted on stems. The last canvas was crafted using felt to make a 3d flower. The original tutorial can be found here.
Thanks to my basic photoshop skills, some canvas, Office Depot copy center and some modge podge and paint, these little art pieces filled in an otherwise blank corner. If you are looking for digital chevron paper, this blog has tons to offer.
I really didn't have a huge vision for this room. Individual projects kind of came together to complete the room. In hindsight I would have chosen a different curtain fabric. It really restricted the design, but it also opened up the color palette to choose from a wide array of colors. If I had more time and energy I would sew some ruffled toss pillows, but for now this is the final project. I do like that these curtains can grow with Baby Girl, and can also be reused for different projects down the road.
Showing posts with label sewing. Show all posts
Saturday, May 18, 2013
Saturday, August 13, 2011
Getting ready for baby
I have been a Sewing Machine!
Pun totally intended.
I have always admired the slings that I see mother's wearing their babies in. I was also a bit envious because I didn't even dream or imagine this stuff when Joey was a newborn. Of course they had Baby Bjorns and I used one while I coached volleyball but it always hurt my back and Joey never looked comfortable in it. I came across some really gorgeous slings on etsy.com when I first found out I was pregnant again. The one I really wanted was over $60, only because it was made with Amy Butler fabric. I found some more modestly priced ones for around $30 which I contemplated about here. However I couldn't decide on the fabric I wanted and I realized I just didn't love either one enough to commit.
Enter in my obsession with Joann's craft store. I found the cutest gray hounds-tooth fabric that I knew would look great on something. I dwelled on it for a couple of days and found a really neat baby sling tutorial on Pinterest.com from The Poplar Porch blog that really simplified the process and dumbed it down enough for me to get how to sew it.
I thought a yellow Chevron striped fabric would go perfect with the gray fabric and so I went on a very short search for it at Joann's and came up with nothing, but I did find a yellow dot fabric that matched well. I took the fabric over to my Mom's and she helped me sew my first sling together. My Mom has sewed since she was a little girl and one of her last projects was sewing me my homecoming dress sophomore year of high school. It was really neat to see her "light up" doing this project since it's been quite awhile since she has sewn.
Here I attempt to model it with a stuffed animal and a self portrait. The picture doesn't do it justice, but it turned out awesome. The fit is not right yet since I have a big baby basketball in the way, but it should be fine post birth.
My adventures in sling making gets even better. I made another with left over fabric from the car seat canopy I also made. Depending on your measurements, it only takes two yards of two coordinating fabrics and some thread and you got yourself, not one, but two slings. So after purchasing and sewing I only paid about $15 total in supplies for two baby slings. Technically, I can make another sling for nothing if I pair the two remaining pieces I have left over from the other two slings. Baby shower present? =) The second one only took about an hour to whip out, since I knew what I was doing.
In addition to sling making I also have created some blankets, diaper/spit up cloths, and a reversible car seat canopy.
The picture below shows both finished slings, a guitar blanket, and the cloths.
I didn't use any web sources for the blanket since those are pretty basic to sew, but I did research what fabric to use for the burp cloths (flannel for absorbency)since I wanted to pair them with the cute fabric I bought on fabric.com awhile back. The guitar fabric was originally intended for the car seat canopy but I mistakenly bought jersey knit fabric and it's very stretchy and hard to pair with regular cotton fabric so I reworked it to make a blanket instead.
The car seat canopy was fun to make, but took a little bit of time. It may be because I did it with my Mother-in-Law and we love to chat, but also because we were brainstorming how to do the ties. I get a little overzealous when I sew and go too fast, but I was really glad to do this project with her because she had some really good tips for me. I used this tutorial from the Vanilla Joy Blog. The instructions were almost like making a rounded blanket with ties to tie on the car seat handle. Since I was making it reversible (using the gray hounds tooth and teal dot fabric from the slings) it was a bit complicated getting it to all work together. None the less though, the canopy came out beautifully and it's probably my best "sewing in a straight line" accomplishment to date.
I unintentionally matched it to the car seat fabric. I say unintentionally because the guitar fabric was my first pick and the teal polka dots fabric was actually purchased to make a hospital gown with, but I have ditched that project...for now.
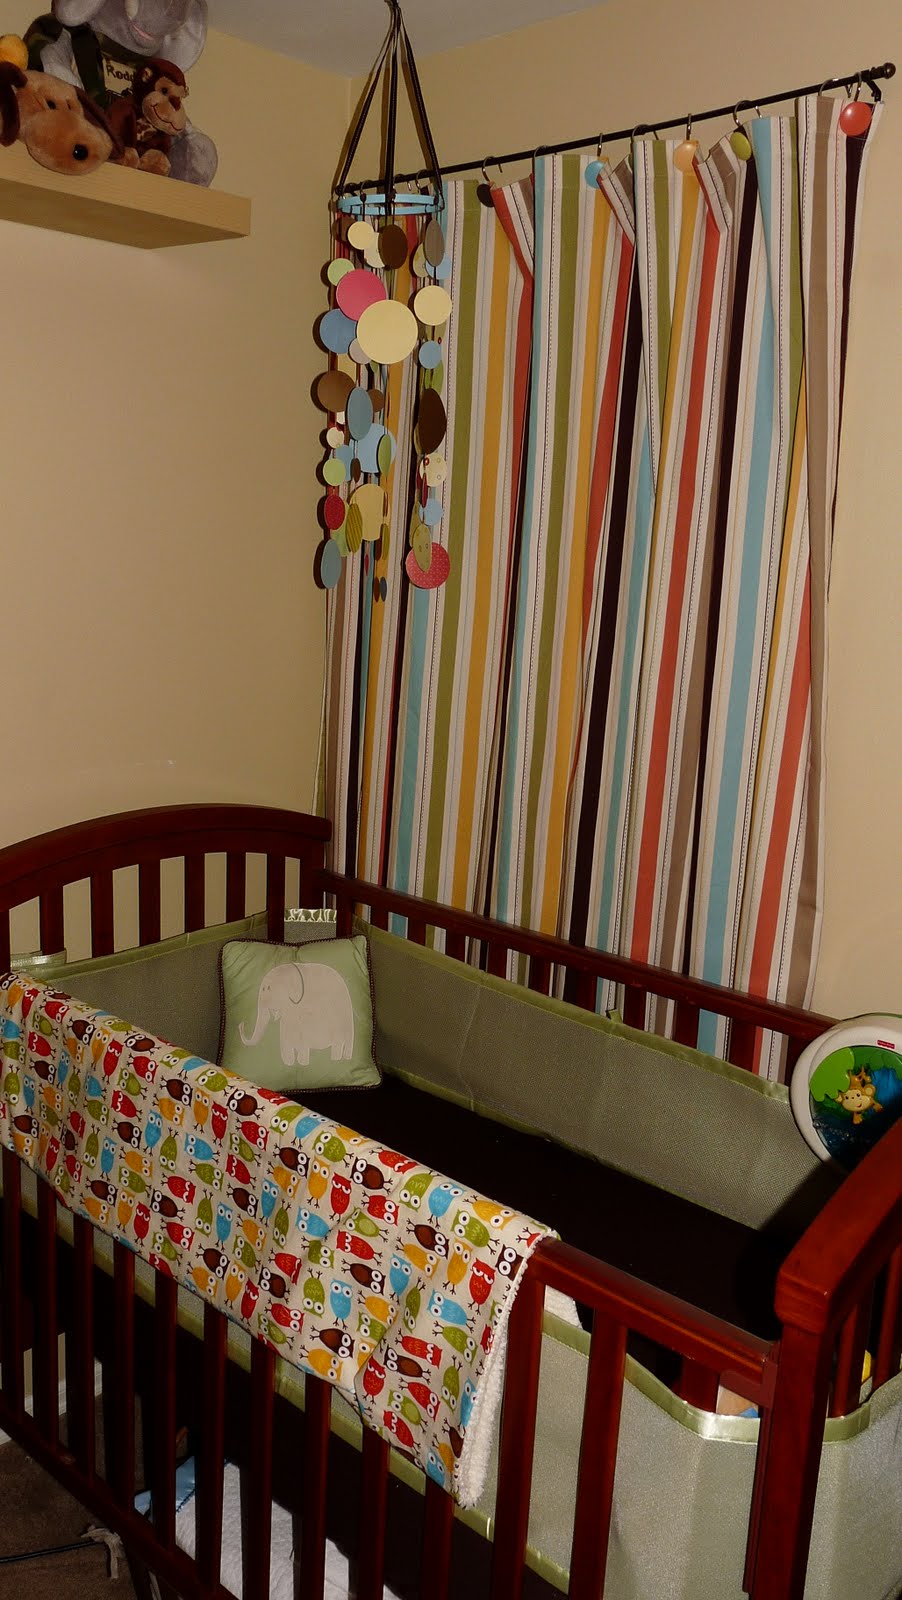
Lastly, here is a sneak peak at part of the nursery. I sewed up this blanket with the adorable Owl Fabric and a chenille underside. It turned out surprisingly well, considering sewing with two completely different fabrics is difficult and the chenille fabric kept slipping and moving on me. I do plan on finishing it with blanket binding for more of a polished look, but I may just leave it the way it is for now. Mainly because I have never sewed binding on before and it looks good the way it is. I would hate to mess it up!
And what the heck, may as well give a tiny reveal of the curtains (hint, it's a cotton shower curtain from target) and the neat paper mobile I made.
I linked these projects up to....
Subscribe to:
Posts (Atom)